The Henley Cheese factory though Autumn and Winter

I have been taking images of the Henley Cheese Factory for a good few months now. Every time I visit there is something new to appreciate. It’s like saying hello to an old friend and enjoying a new and engaging story about their life. In this update I want to highlight 3 images.

This is an image I took around 5am in the morning when it was still dark. The night sky was clear and the moon was beaming bright over the landscape. Apart from the background light trails of cars on State Highway 1, the image has the appearence of a bright sunny day.

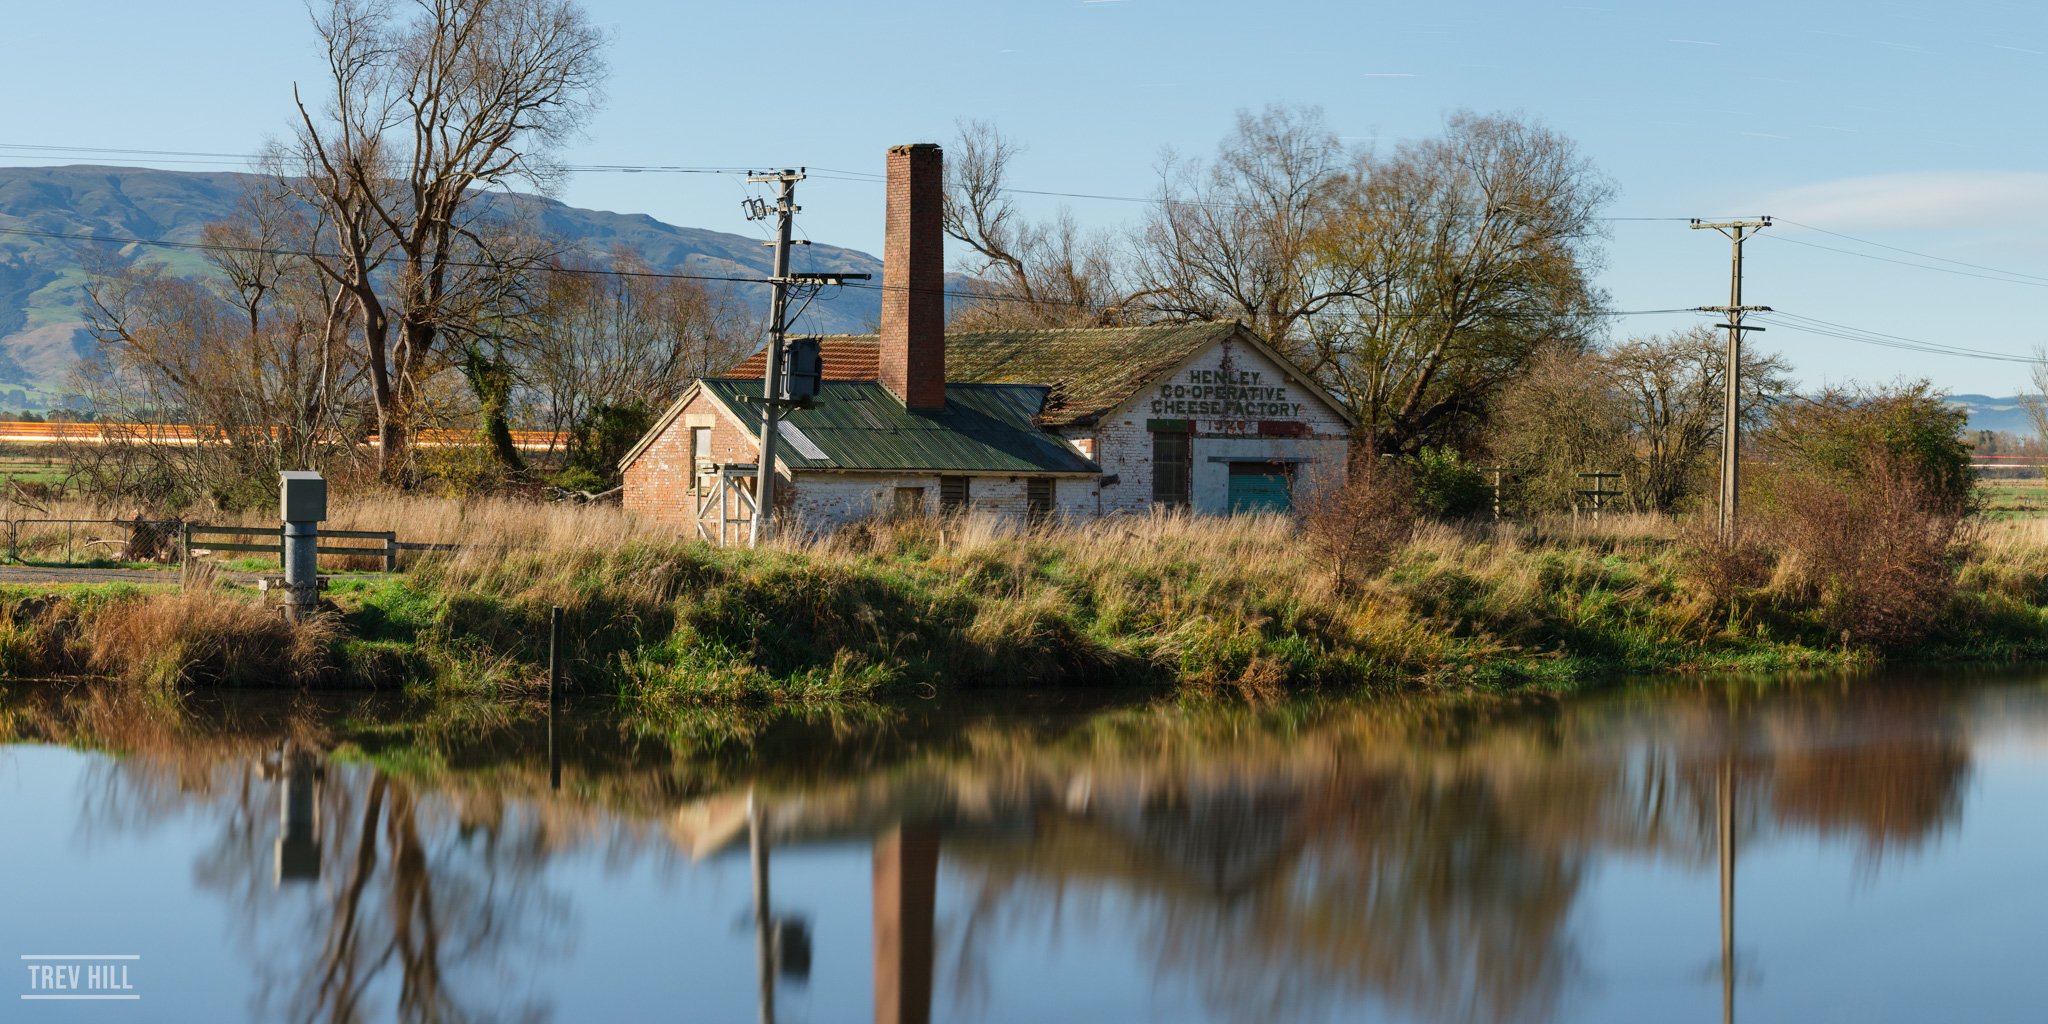
Henley Cheese Factory by moonlight.

In this next image a thick shroud of fog envelopes the factory. The calmness of this scene with its glass like reflection was very relaxing. When you take the time to slow down and connect with an environment like this it can be really rewarding.

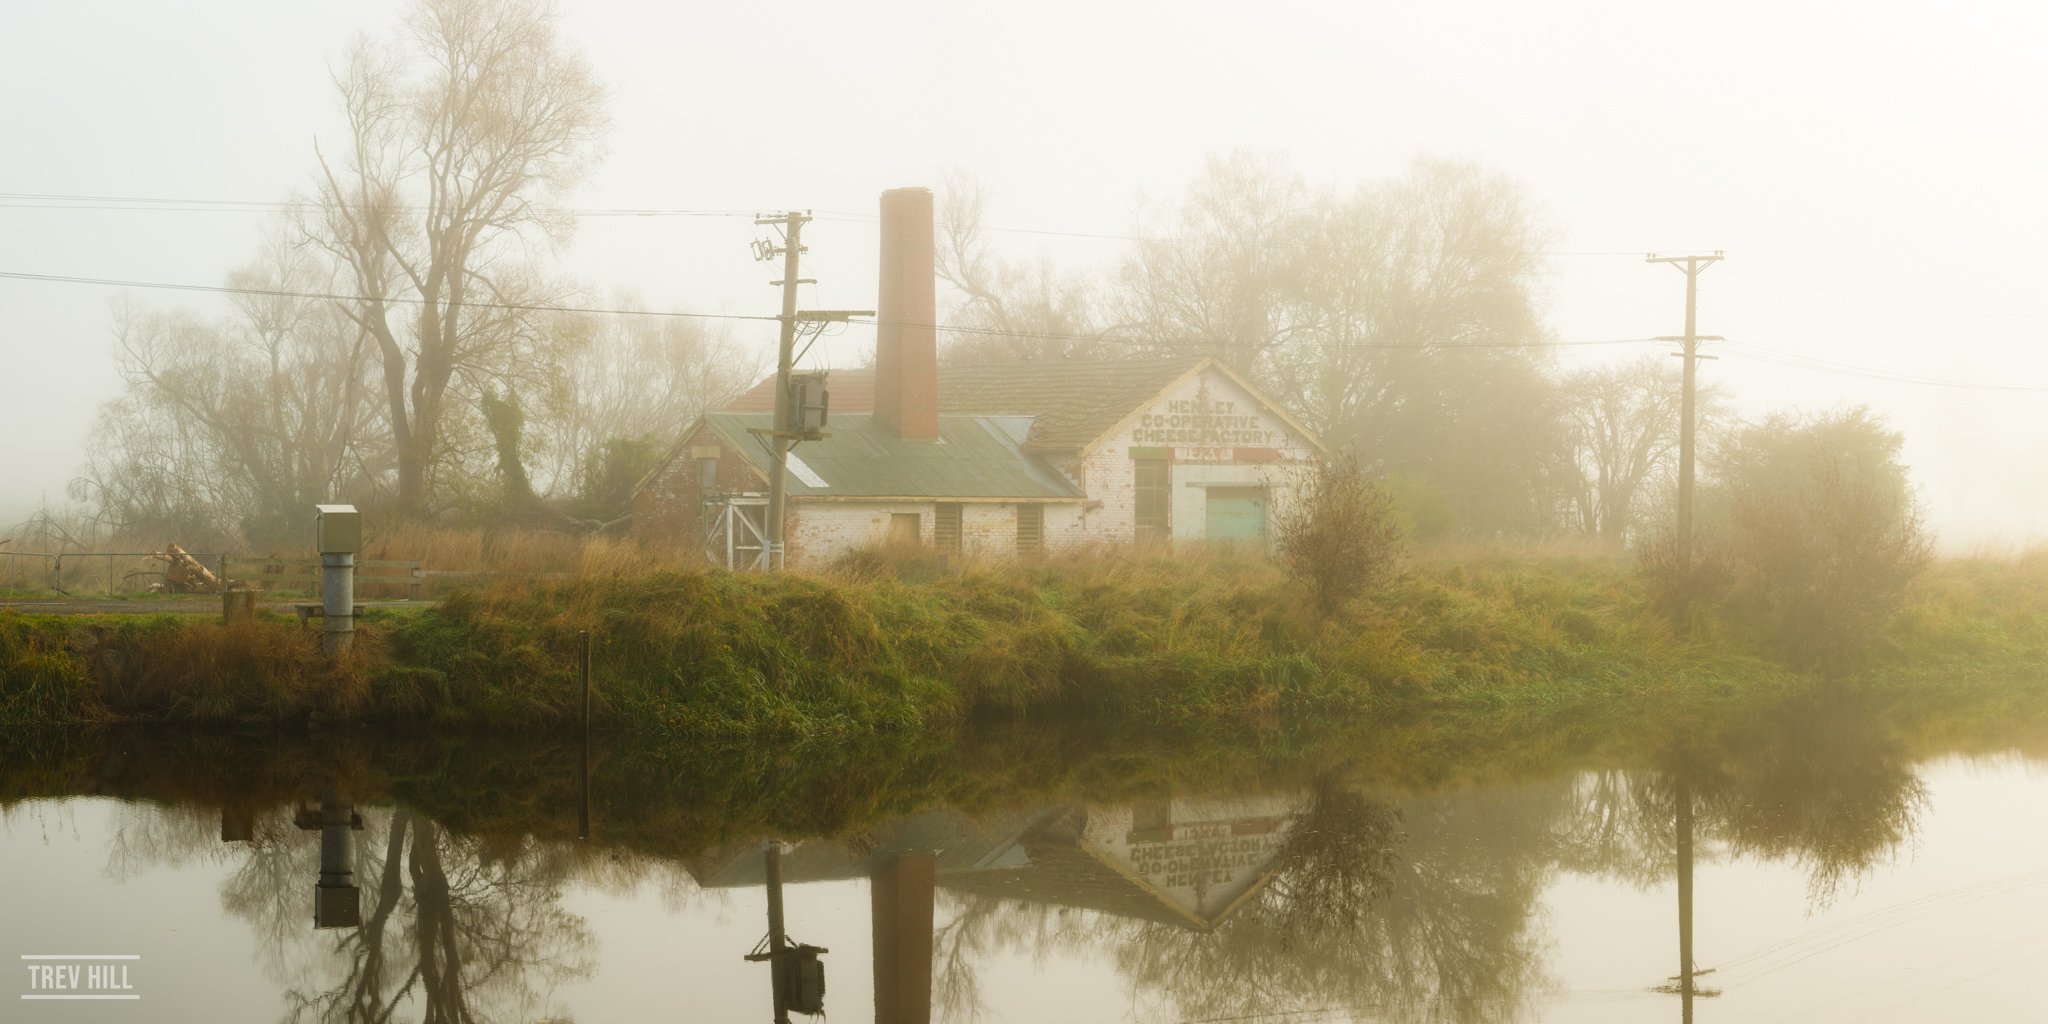
Henley Cheese factory in fog.

The image below was taken during a morning sunrise. The grass is covered in a rather biting frost. On chilly days like this I look forward to grabbing a coffee afterwards.

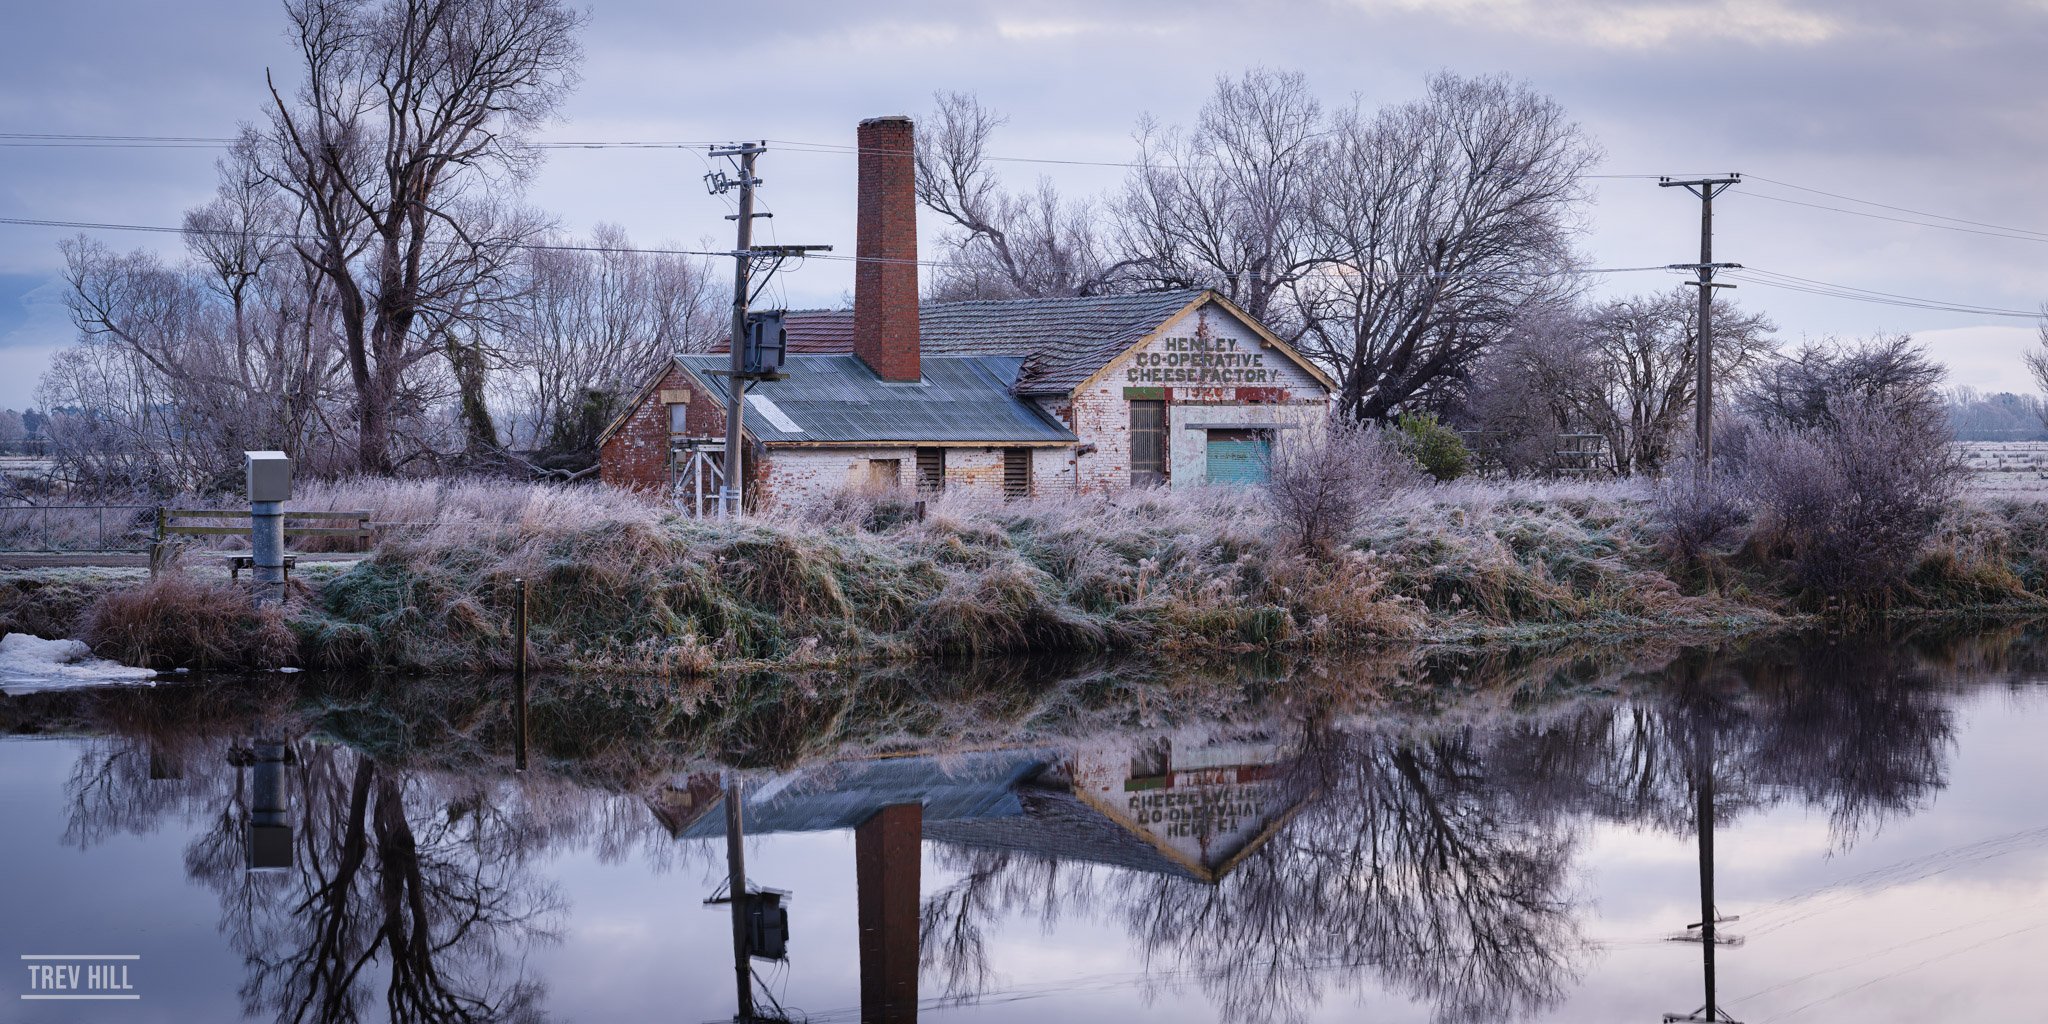
A frosty morning at the Henley Cheese Factory

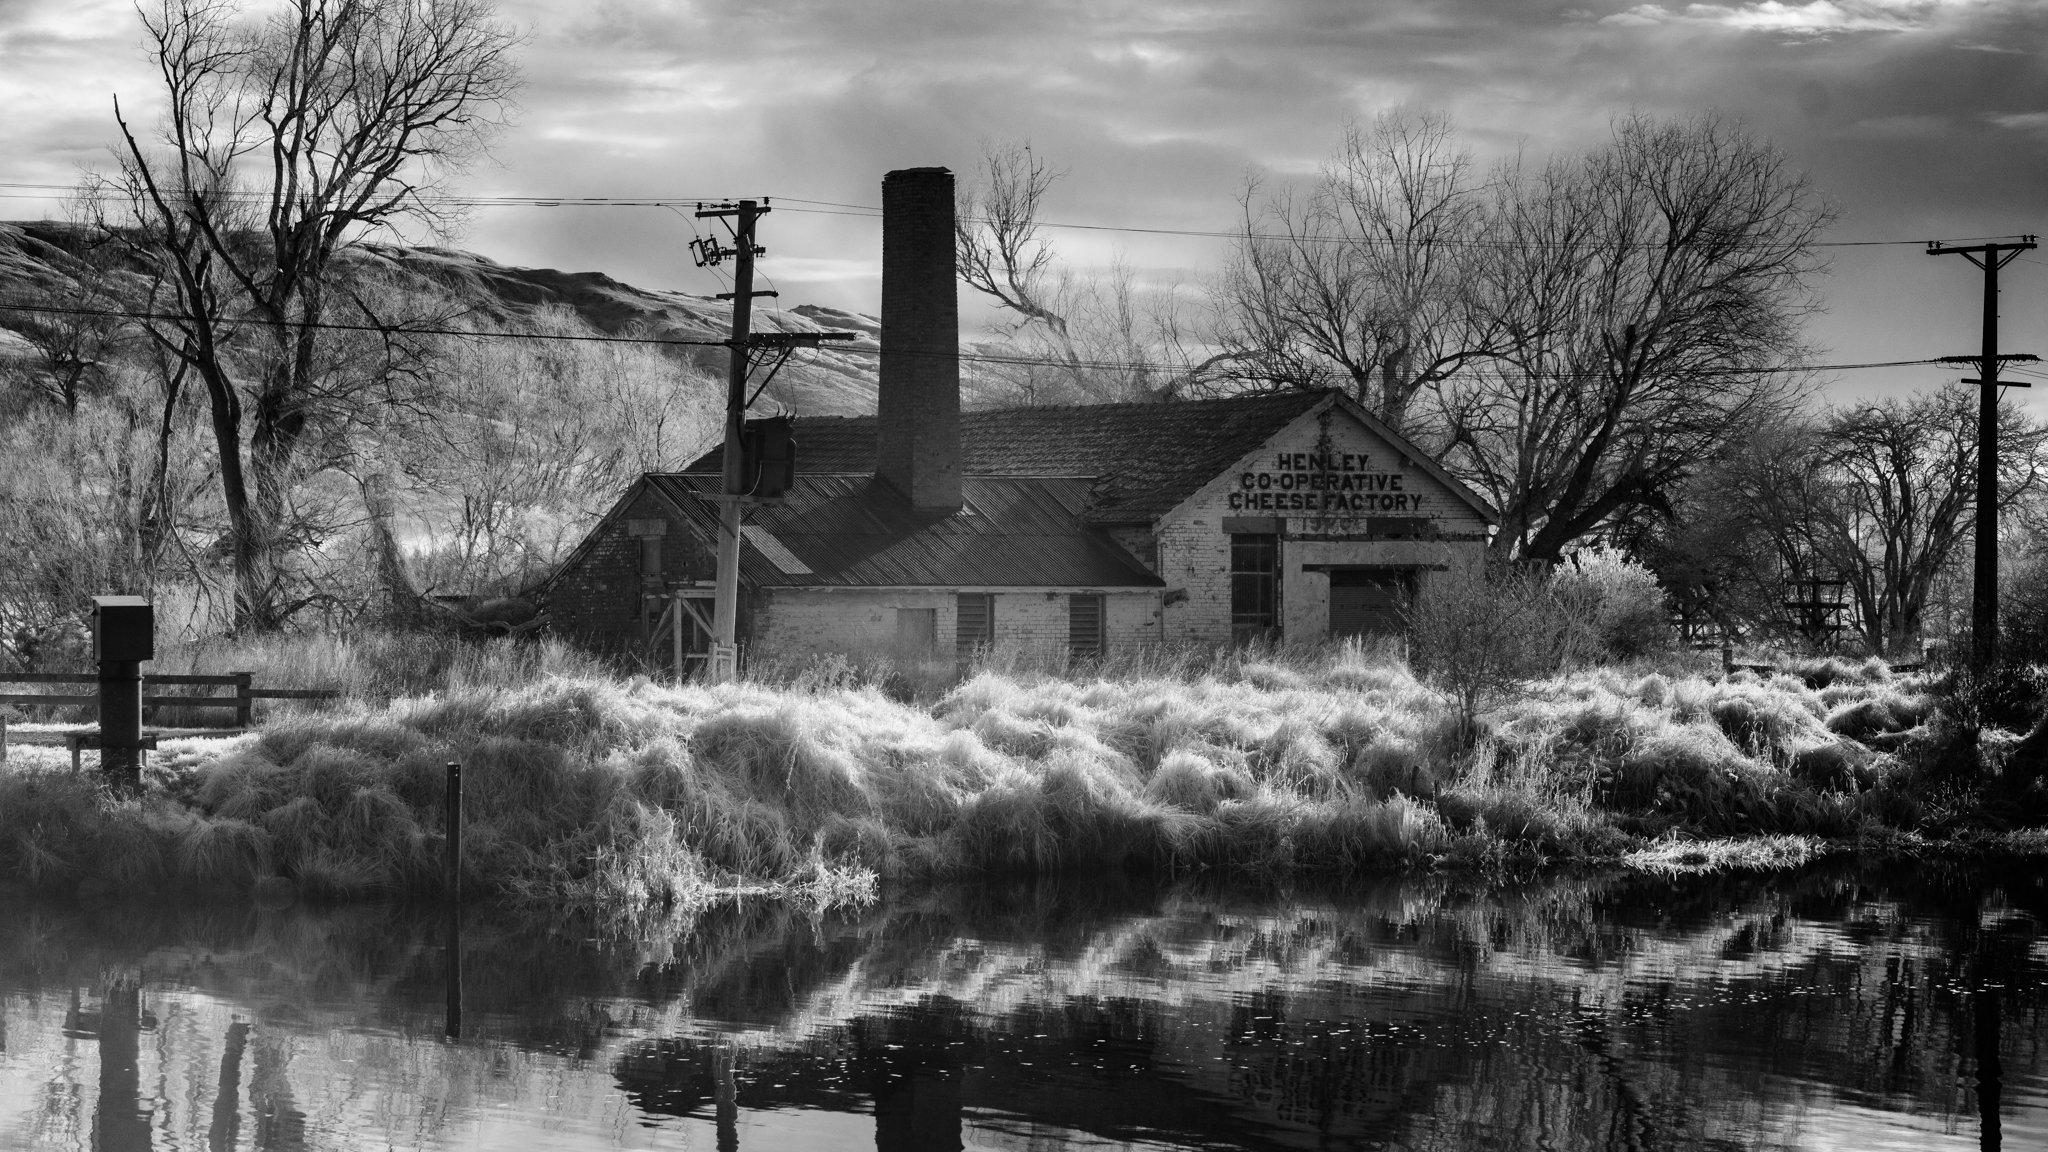
Infrared Black and White.

When I started this ‘study’ of the Henley Cheese Factory I wasn’t sure how the journey would evolve. Currently I am consistently photographing the building from about the same perspective. I could change it up, but I find there is comfort in familiarity of form and composition, so for now, I’ll just keep on keeping on. Thanks for stopping by and reading this small blog.

Dunedin Landscape Photography: St Clair Beach

Getting There

St Clair Beach is easily one of the most popular destinations for locals and visitors alike to enjoy a swim, stroll or a coffee in one of the lovely seaside esplanade cafes. It is less than 10 minutes drive from the centre of Dunedin city, Access to the St Clair Esplanade and the beach is via Victoria road. There is plenty of free parking along the waterfront.

A cafe and surf shop on the corner of the St Clair Esplanade.

A cafe and surf shop on the corner of the St Clair Esplanade.

The main reason many landscape photographers flock to St Clair beach is to photograph the old set of piles that were originally designed to help stop erosion on the beach. In 2015 a huge set of king tides pulverised the poles which had numbered beyond twenty, now only a few remain.

St Clair Poles 2015 New Years Day.

St Clair Poles 2015 New Years Day.

St Clair Poles July 2015. King tides decimate the poles and suck the sand from the beach exposing rocks and pebbles.

St Clair Poles July 2015. King tides decimate the poles and suck the sand from the beach exposing rocks and pebbles.

St Clair Poles as they look today.

St Clair Poles as they look today.

Pink hues from the sunset match the flowers in the foreground of this image, I placed the famous poles in the background to give context to the location.

Pink hues from the sunset match the flowers in the foreground of this image, I placed the famous poles in the background to give context to the location.

A moody start to the day on St Clair beach.

A moody start to the day on St Clair beach.

Summary

It would be a shame to visit Dunedin and not visit St Clair beach, even if it were only to stroll along the Esplanade. However the spot tends to get lovely sunrises and sunsets so is well worth a trip out with your camera.

Trev Hill is a professional photographer based in Dunedin.

Dunedin Landscape Photography: Tunnel Beach

Getting There

Access to Tunnel beach is located at the end of Tunnel beach road about 10 minutes drive from the city centre. The track to the beach is well constructed but it drops down onto the beach at a steep gradient. I have seen people go down easy enough but some do struggle to ascend again. There is a park bench or 2 to rest on if required. The walk down to the beach is no more than 10 minutes, however photographers might want to stop and take an image on the way down.

Elevated view of Tunnel beach in spring with gorse flowering

Elevated view of Tunnel beach in spring with gorse flowering

Plenty of Compositions

Tunnel beach offers up various viewpoints to take interesting images.

The steep pathway down to the beach creates a nice leading line into the composition.

The steep pathway down to the beach creates a nice leading line into the composition.

These small fences have only been erected in the past year or so to help stop tourists from falling over cliff edges. I have used the grass and the fence to create a leading line into the image.

These small fences have only been erected in the past year or so to help stop tourists from falling over cliff edges. I have used the grass and the fence to create a leading line into the image.

Tunnel beach at sunrise. The foreground clump of land helps balance the image.

Tunnel beach at sunrise. The foreground clump of land helps balance the image.

Sunrise on Tunnel beach.

Sunrise on Tunnel beach.

Here I am photographing from the most dominant cliff edge to the coastline beyond.

Here I am photographing from the most dominant cliff edge to the coastline beyond.

Here I just focused on the grass and the flowers in the foreground letting the cliff fall out of focus.

Here I just focused on the grass and the flowers in the foreground letting the cliff fall out of focus.

The arch is a great subject to shoot, but be careful of rouge waves and the slippery rock.

The arch is a great subject to shoot, but be careful of rouge waves and the slippery rock.

Summary

These are just a few examples of possible compositions at Tunnel beach. I know there are plenty more images to be had from this great location. You will be pleased to know there is tunnel access down onto the beach.

If you are visiting Dunedin a trip to tunnel beach is a must, but I suggest either going early or late to avoid the tourists.

Trev Hill is a professional photographer based in Dunedin.

Whanganui river canoe adventure

My mate Jason took me to some great Cuba street bars in Wellington about 3 weeks ago, a few craft beers later I was persuaded to join him on the Whanganui river for a canoe adventure. Well, what an adventure it turned out to be. A combination of agony and harmony, calm and excitement. If you read no further and just take a look at my images please understand this; the Whanganui river is an adventure, a stunning pristine stretch of water, lined with lush native bush. If you have a reasonable fitness, I highly recommend you give it a go.

Canoes by the riverside at Mangawaiiti campsite.

Prep: Taking a Vegan Holiday

I have been a vegan for the last 4 months, but I knew taking this trip with 5 other meat eaters would mean I might want to relax my diet and just eat the same as everyone else. My mate Jas loves food, so we had a big supermarket shop including; steak, mince, salami, 2 dozen eggs, biscuits, vegetables, fruit, snack bars and a few beers. Good food is awesome, but remember we had to take it all with us, and our canoe ended up with 4 heavy barrels and two large bags on it for the duration.

HELPFUL TIP 1 - Buy dehydrated food packets from outdoor shops to save on weight and hassle. It is important to note that the New Zealand Department of Conservation asks everyone to take their rubbish with them. There are no rubbish bins provided at any campsite, so any sort of food scraps and waste have to leave with you. The upside of this is you see no rubbish anywhere, it is brilliant.

Phil and Colin paddle through the calm water of the Whanganui river

Day One: Completely knackered

The trip we were on was spread over 3 days and in total we planned to travel 88km by canoe. On the first day we were travelling 47km. I didn’t really think too much about it, I just thought let’s get stuck in and have some fun. After about 3 hours of paddling I could feel my body start to waiver. This wasn’t at all relaxing, it was hard work. To top it off a large group of older kayakers who looked at least 65+ overtook Jas and I. I watched on in awe as an elderly grandmother and grandad just churned through the water in a blur past us.

By hour 5 my forearm was cramping, my back was killing me and my bum was super sore from the plain wooden seat. But despite the discomfort the scenery was sublime, I was completely in love with the long stretches of still water, it was good for the mind. Wild goats grazed by the waterside. This was truely special.

Finally we reached the Mangawaiiti campsite sometime around 5.30pm. Just when you think you can relax you then realise the campsite is elevated about 7 stories above water level. When the Whanganui river floods it fills the narrow ravines of the river and it rises dramatically. So Jas and I had to lug all 4 heavy barrels and 2 large bags up the steep ‘Baldwin street’ like path to the campsite.

HELPFUL TIP 2 - All of the campsites on the Whanganui river are elevated from the river so the lighter you travel, the easier it is for set up.

The steep ravine walls of the Whanganui river rise up and tower over you. They were as imposing as they were beautiful with the calm tranquil water of the river below.

Day 2: The Bridge to Nowhere

Day 2 certainly felt like it should go a lot quicker since we were only travelling about 20 km. After 2 hours of paddling we stopped to take a bush walk to the ‘Bridge to Nowhere.’ The Department of Conservation have done a marvellous job with the track and there are 3 long drop toilets available for use.

The Bridge to nowhere, Whanganui, New Zeland.

View from the Bridge to Nowhere. Sharp eyes saw eels in the water below.

Back on the water I hit a wall, and it was only the taste of a fresh golden delicious apple that gave me the energy to keep going. That would be the last time I struggled, for the rest of the journey things just fell into place.

HELPFUL TIP 3: if you are sharing a tent or are in close proximity to other middle-aged men, please take ear plugs. They snore loud and proud. One of our group sounded like a bear growling. Most of the other campers seemed to be fit young people, I can only imagine how much they enjoyed the snore fest.

This scene of the Whanganui river reminds me of an impressionist painting.

DAY 3: MAN OVERBOARD

The whole trip people kept banging on and on about the big rapids on day 3. Well, I have to say if anything the excitement and anticipation those rapids brought really added some spice to the trip. By this stage my body was becoming adjusted to the demands of paddling on a canoe, plus we had lightened our load of food and beverage considerably. When Jas and I tackled the first big rapid, it was a relief and really a lot of fun. the canoe bounced up and down, but kept its line we took so I stayed afloat. The next big rapid up ahead did have some cause for concern as a canoe was stuck sideways against a boulder with the rushing water holding it there. We had to go past that boulder and both Jas and I just put the hammer down and went for it. We made it through and were riding high on confidence. But the next rapid had the nickname ‘50/50’

A canoe capsizes on the 50/50 rapid, Whanganui River.

We nearly made it through, but came unstuck when we hit the side of a rapid and I went in. The water was lovely and fresh and to be honest it was a fitting and memorable way to finish the adventure.

HELPFUL TIP 4: Don’t be too concerned about falling out of a canoe, the worst part of it is having to bail out all the water and the strong likelihood your belongings just got a little wet.

HELPFUL TIP 5: invest in a few cheap dry sacks to help provide an extra layer of protection for your gear to stay dry.

All in all this was an amazing adventure. As long as you have a reasonable fitness level a Whanganui River canoe adventure should go on your bucket list.